The Advent of AI
Getting Started with Text-to-Image Generation
Text-to-image generation needs a powerful NVIDIA GPU with at least 4 GB VRAM. You can run Stable Diffusion on an Apple M1 chip. The easiest way to get started is either with UnstableFusion for Windows, Mac, and Linux, or with Diffusion Bee for Mac.
Though it’s possible to run it on the CPU, this is extremely slow and not recommended. For comparison, I generated images with the same prompt on DreamStudio in 9 seconds, on my iPad Pro M2 in 58 seconds and with Diffusion Bee on a MacBook 2016 in 7 minutes.
If you’re just curious and don’t to pay for the necessary hardware, or create an account on one of the platforms, you can try the old DALL·E Mini. It’s now a free service rebranded as Crayon. The quality of the results is months behind the quality of the current models, but it’s a good starting point to get to know the technology. Another option is to use the free contingents of various services mentioned in the last essay.
Draw Things
If you have an iPad or iPhone, you’re in luck because a free app is available on the App Store that allows using dozens of free image models based on Stable Diffusion. The name of the app is Draw Things: AI Generation, developed by Liu Liu. The app is mind-blowing and I highly recommend it.
The developer improves the app constantly by adding interesting new models. I downloaded over 50 GB of model data. Besides the official versions of Stable Diffusion, there are models from the community. The most important website for models is Hugging Face, an AI community to build, train and deploy models powered by the reference open source in machine learning. It’s the GitHub for AI. You can find exciting projects on Huggingface, for example diffuse the f rest, where you draw an image and provide a prompt and the AI will generate a better version of it.
Diffusion Models
You can find most models available in the Draw Things application on Hugging Face. A lot of the models are trained in a specific style. I list here all available models of the app at the time of writing, you can see examples of each model at the linked URLs. You can find here a more extensive list of models for Stable Diffusion.
- Stable Diffusion v1.4
- Stable Diffusion v1.5
- Stable Diffusion v1.5 Inpainting – Inpainting in existing photos
- Stable Diffusion v2.0
- Stable Diffusion v2.0 768-v (HD)
- Stable Diffusion v2.0 Inpainting – Inpainting in existing photos
- Stable Diffusion v2.1
- Stable Diffusion v2.1 768-v (HD)
- MiniSD v1.4
- Waifu Diffusion v2.1 – high-quality anime images
- Nitro Diffusion v1.3 – this model can create multiple styles: Archer style, Arcane style, or modern Disney style
- Cyberpunk Anime Diffusion – Cyberpunk anime characters
- Redshift Diffusion v1 – high-resolution 3D artwork
- Redshift Diffusion 768 (HD) – Stable Diffusion 2.0 trained on Redshift style
- Dungeons and Diffusion – trained on DnD characters
- Tron Legacy – trained on screenshots of the film Tron: Legacy
- Openjourney – model trained on Midjourney images. If you love Midjourney, you’ll like this style
- Anything v3 – model for high-quality anime
- Classic Animation Diffusion v1 – this model creates the classic Disney animation style
- Modern Disney Diffusion v1 – Creates the style of modern Disney movies
- Arcane Diffusion v3 – model trained on the style of Arcane.
- Hassanblend v1.4 – ⚠️ model trained on NSFW content
- Van Gogh Diffusion v2 – model based on the movie Loving Vincent
- Spider-Verse Diffusion v1 – model trained on movie stills from Spider-Man: Into the Spider-Verse
- Elden Ring Diffusion v3 – model trained on the game art from Elden Ring
- Paper Cut v1 – model trained on paper cut images
- VoxelArt v1 – model trained on Voxel Art images
- Balloon Art v1 – model trained on Twisted Balloon images
- F222 – ⚠️ model trained on NSFW content
- Super Mario Nation v2 – model trained on Gerry Anderson’s Supermarionation
- Inkpunk Diffusion v2 – model on dream booth, inspired by Gorillaz, FLCL, and Yoji Shinkawa
- SamDoesArt v3 – model trained on the art style of Sam Yang.
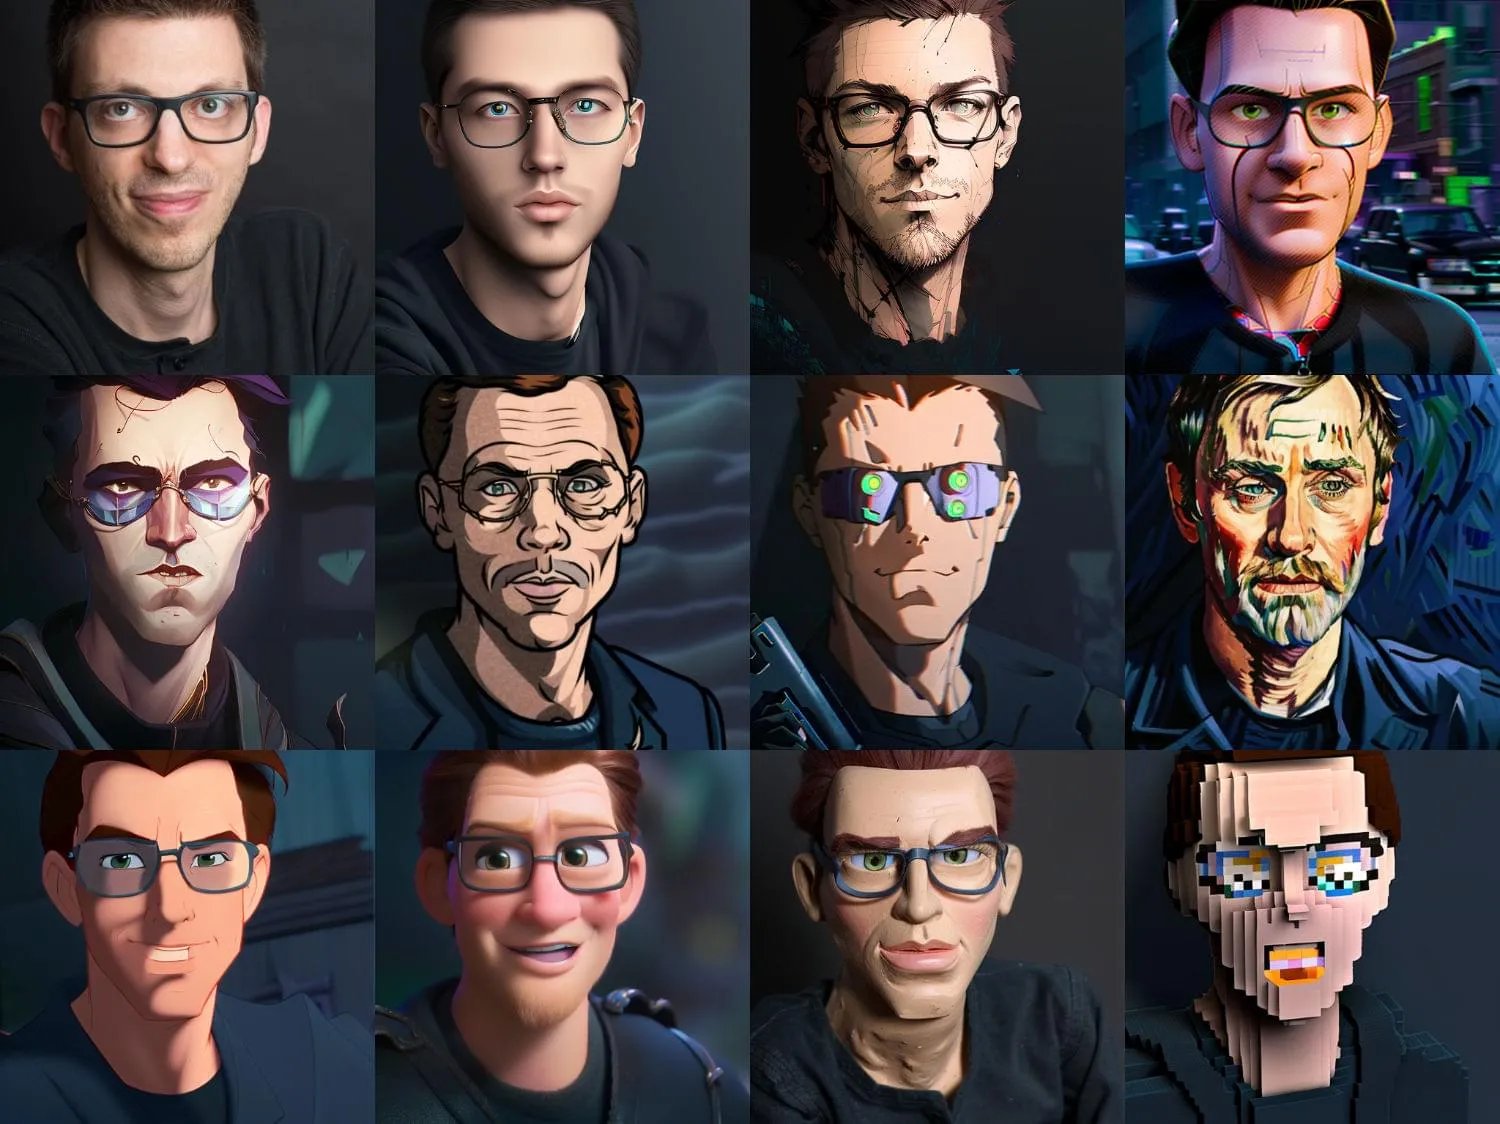
To show what the models are capable of, I used my profile picture with different diffusion models. I used the same seed, no prompt, 50 steps, a guidance scale of 13,0, a strength of 46%, and the Euler Ancestral sampler. 46% as a strength value means it took roughly half of the source photo and the rest was creative. Lower values generate an image that looks like the source image, higher values generate images that look like the style the model was trained on. If you combine it with a prompt, you can get even more creative results, but you can never change the basic geometry of the image. For that, you need to train a new model with your face in Dreambooth.
Diffusion Models
When you start with text-to-image generation AI, many terms will not make any sense to you. But without understanding these basics, good results are mostly luck.
The first term you’ll hear, is “Diffusion Model.” As I can’t explain it myself, I asked GPT-3 to explain it:
It is a model that is trained to generate images from text. It is called “Diffusion Model” because it is based on the diffusion process. The diffusion process is a mathematical model that describes how a substance spreads in a medium. The diffusion process is used in many fields, for example in biology, chemistry, and physics. In the context of text-to-image generation, the diffusion process is used to describe how the model spreads the text information over the image pixels.
In this video, you get the whole process of how AI image generators work explained.
Prompt
The most important part of the generation of AI images is the “prompt.” Entire books with hundreds of pages exist about how to write a good prompt. The prompt is your way to talk to the AI.
If you write a simple prompt, the result might be good at random or total crap. Each generator has its own rules on how to write a good prompt, but the basic technique is similar. You have to write detailed and descriptive what you want to see in the image, the word parts are usually separated by commas. The order of words is essential.
Some generators allow negative prompts, to exclude specific things from the image. You could, for example, ask the AI to generate a picture of a jungle, but exclude the color green from it. Often it’s possible to weigh specific parts of the prompt, to signal the AI which parts are more important. In Midjourney you use the more weight::2.0 (negative or positive numbers) to weigh a part of the prompt, in Stable Diffusion you can use the more weight:2.0 or brackets ((more weight)) to weigh a part of the prompt.
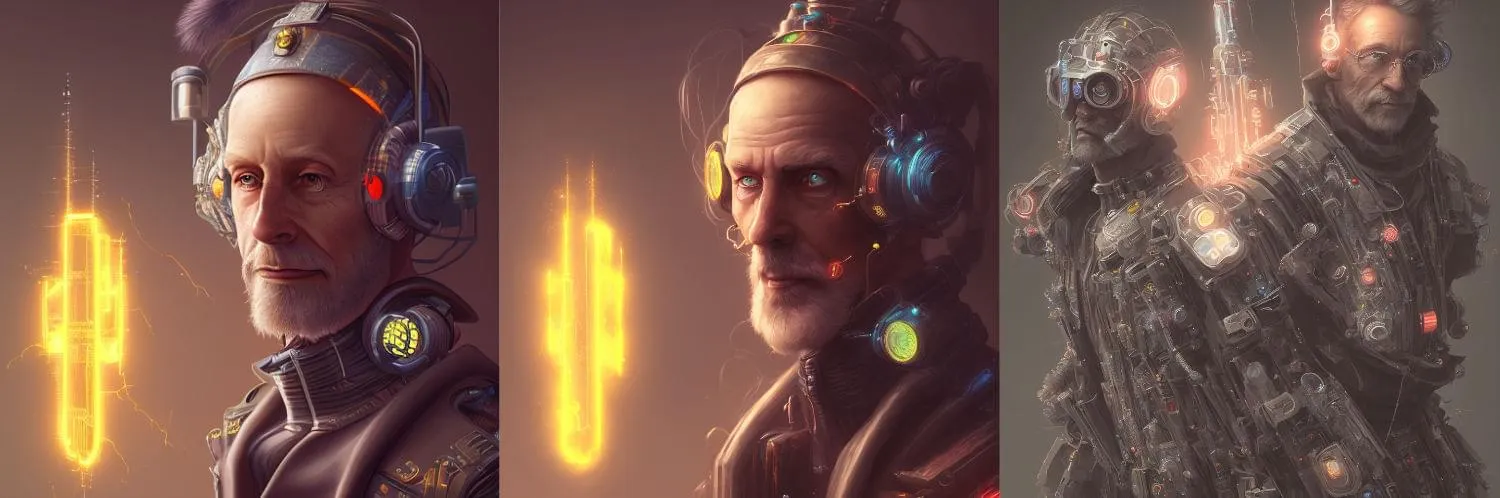
My first prompt was basic, I asked the AI to generate a cyberpunk wizard. The result was impressive, but random luck. I recreated the first two images with the same seed and upscaled the second one to add more detail. But the third image, generated with a new seed, created a complete different picture.
The art or skill of writing a good prompt is somewhere between programming, art direction, art history, photography, and writing. The more you know about formats, lenses, colors, lighting, art, artists, photography, painting, and many other art forms, the better you can write a good prompt.
Many websites are helping with the creation of prompts. Some have a build in search engine, others vast documentation, or even generators for prompts for different models.
PromptoMANIA has a Prompt Builder that supports Midjourney, DreamStudio, Stable Diffusion, CF Spark, and Generic prompts. Prompthero allows searching millions of images for Openjourney, Stable Diffusion, DALL·E, and Midjourney. AiTuts has a huge prompt library with fantastic images, a free prompt book (The Big Book of Prompts), and a blog with useful getting-started articles on many generators. Diffusion Land has a search and archive for many Stable Diffusion models. ArtHub.ai has a prompt library and a massive collection of community art. Rex Wang has a website with a Dynamic Prompt generator. He has also the remarkable project Teapots and Midjourney, which explains styles, themes, mediums, materials, camera properties, and many more things for Midjourney, Stable Diffusion and DALL-E at the example of a Utah Teapot.
Style Guides
Speaking of all the different styles, the next thing is to look at style guides. To create a good prompt, you need to know as many things as possible about everything related to the appearance of your image. But unless you hold a degree in art history or are a professional photographer, art director, or artist, you will need one of the many style guides on the internet. Here is a short list of interesting ones:
- Midjourney Styles and Keyword Reference
- Disco Diffusion 70+ Artist Studies
- 56 Awesome Midjourney Examples to Jumpstart Your Ai Portrait Generating
- 9 Tricks for Writing Ai Prompts to Create the Best Midjourney Portraits
- V4 Midjourney Reference Sheets
- Open Library of Styles by the MJ Community
- Midjourney Style Guide
Even though, the style guides are explicitly for a specific generator, you can learn a lot from them and achieve a similar result with a different generator.
Seed
A seed is a starting point for generating an AI image. It can be a random value or a specific input, like a text description or sample image. The seed determines the initial conditions for the image generation process. If you know the seed of a generated image, you can use it to create the same image again. This is useful for generating a series of similar images, such as a series of images featuring the same person.
Inpainting & Outpainting
Inpainting is a technique used in image processing and computer vision to fill in missing or corrupted parts of an image. Inpainting algorithms can be used to restore damaged or degraded images, remove objects from an image, or fill in gaps in an image. These algorithms work by using information from surrounding pixels in the image to estimate the values of the missing or corrupted pixels. In the context of AI image generation, inpainting can be used to improve the quality of generated images by filling in any missing or incomplete pixels.
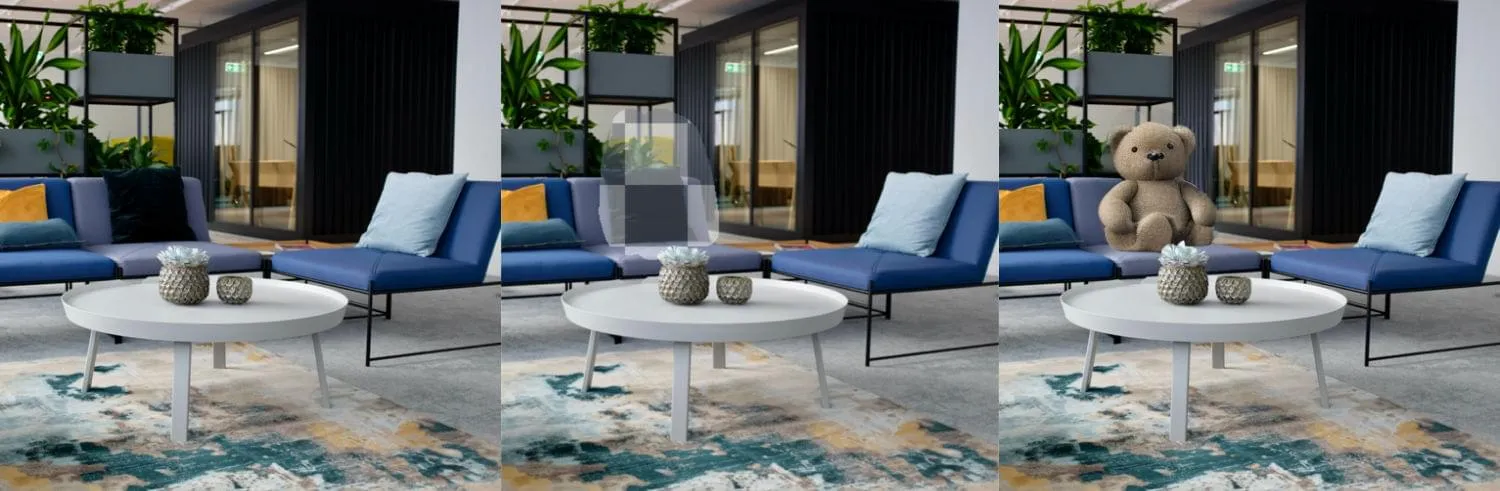
The simplest form of inpainting is to remove a specific object from an image. For example, if you want to remove a person from an image, you can use an inpainting algorithm to fill in the missing pixels with the surrounding pixels. It is possible to fill the area in with a prompt. In the image above, I asked Stable Diffusion to fill in a teddy bear, sitting on a sofa.
DALL·E and Stable Diffusion support outpainting. With this technique, the AI tries to fill in the missing parts of an image and extend it. Here is a longer Stable Diffusion Outpainting Colab Tutorial showing how to do it with a GoogleColab notebook.
Other Settings
Depending on each generator, there are other settings. The most important is the format of the image. You need to pick the aspect ratio and size, it’s not easily possible to recreate for example an image generated in a 1:1 format in 16:9. The different size will generate a different image, even with the same seed. With some luck, it might look similar.
You need to select how many steps should be applied to the image, the higher the number the better the result, but the longer the process takes. I use Stable Diffusion with values between 30-50 steps.
Stable Diffusion has a Guidance Scale setting that decides how literally the AI takes your prompt, higher values are more faithful to the prompt. I usually use some value between 7-13. Other generators have similar settings.
It’s possible to use different samplers in Stable Diffusion, but the details are too scientific for me. Even the explanation of ChatGPT for the different samplers didn’t help me understand it. The Draw Things app writes:
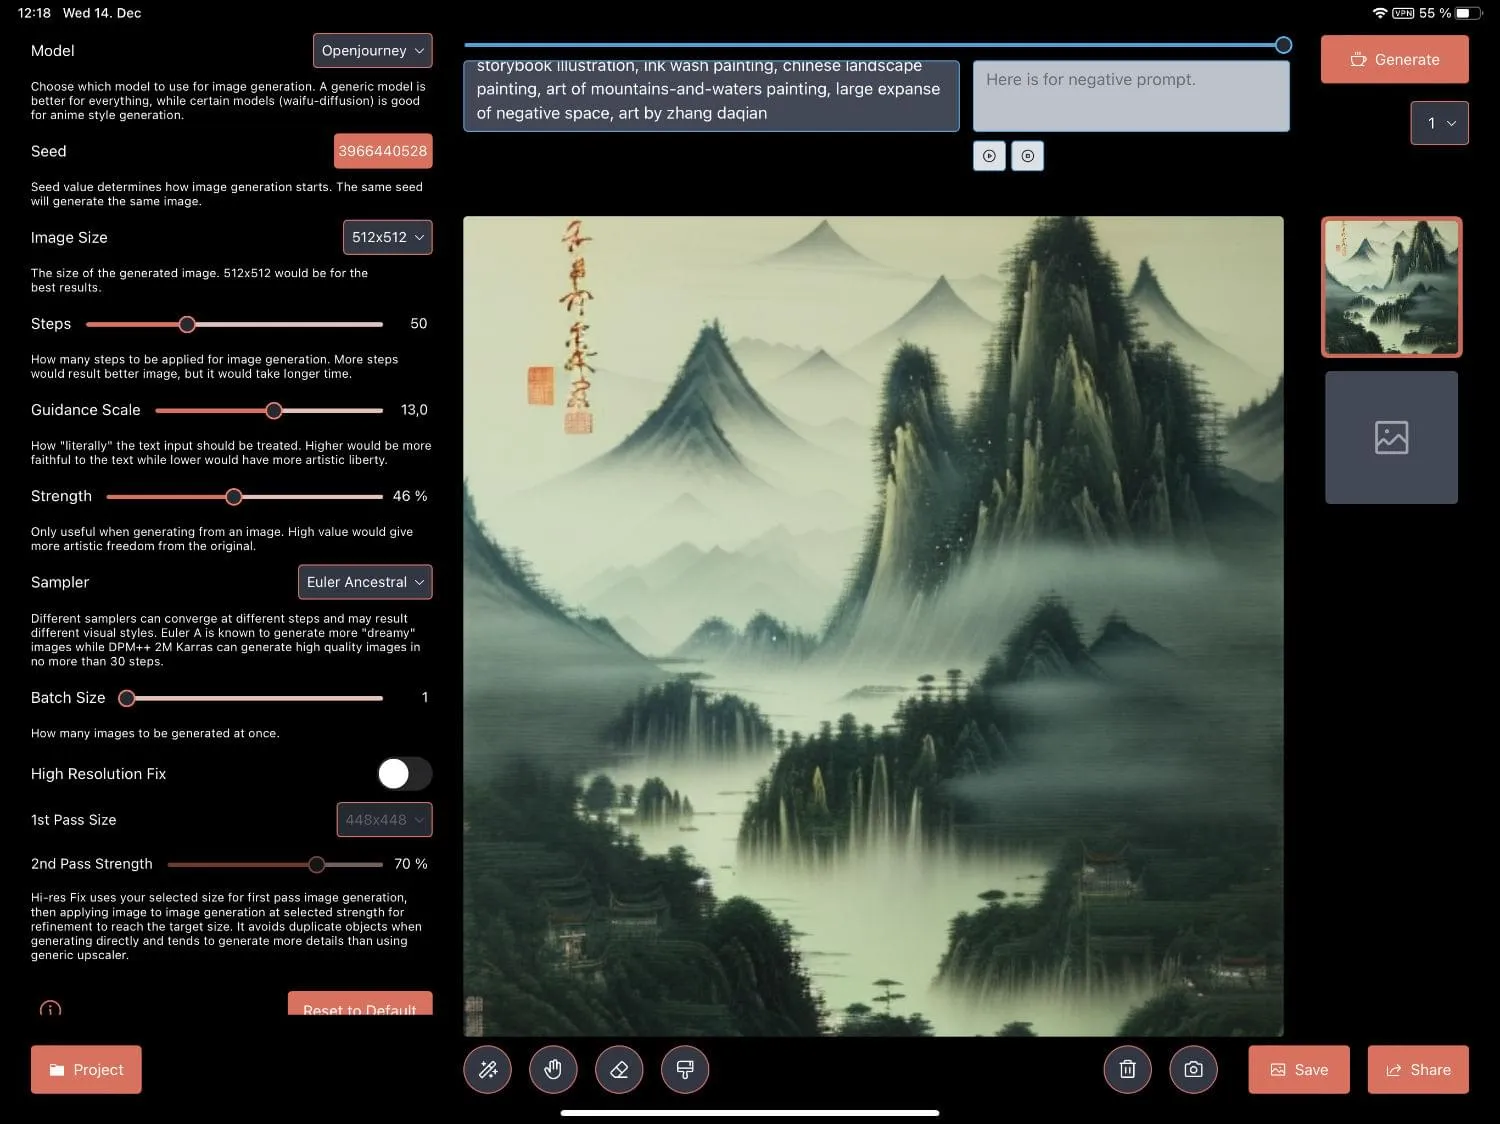
Different samplers can converge at different steps and may result different visual styles. Euler A is known to generate more dreamy images while DPM++ 2M Karras can generate high quality images in no more than 30 steps.
Conclusion
You are now equipped with the knowledge to start your journey with AI. I covered speech-to-text generation, text generation, text-to-image generation, the various generators and Stable Diffusion models, and the different settings. I hope you will have fun with it and create spectacular images.
🤖 I researched this series of essays with ChatGPT, wrote it with GitHub Copilot, created the cover artwork with Stable Diffusion, and improved their quality with Real-ESRGAN.